DAWS
Ps : Be aware some shortcuts may be different depending on Logic 10.x.x Version and above
- Capture a MIDI Recording After it's Played: Shift + R
- Zoom in and Out: Command + Arrow Keys
- Zoom to fit Locators, store Navigation Snapshot: Shift + Ctrl + Z
- Toggle Zoom to fit Selection: Z
- Reset Zoom: Command + A then Z
- Move the Playhead by Musical Bars: , or .
- Move Region to the Playhead position: ;
- Easily Cycle/Loop a Specific Area: Command + U
- Move Through Plugins Settings/Presets: [ and ]
- Learn a Parameter to Your Keyboard Controller: Command + L
- Record Live Parameter Movements: Control + Command + A
- Repeat Entire Sections: Control + Command + R
- Convert Loops to real copies: Control + L
- Convert Audio Regions to Independent Copies: Alt + Command + F
- Don t forget to check Strip Silence to chop recording takes automatically.
- Cut / Delete Selection and time Between Locators (not chopping) : Draw in a Cycle to create locators: Control + Command + X
- Add time between Locators (Insert Silence between Locators) : Draw in a Cycle to create locators: Control + Command + Z
- Adjust selection from transient to transient with the marquee tool for a perfect loop : Left/Right Arrows to change the starting point, Shift + Left/Right Arrows to change the ending point
- Open Region in External Sample Editor (eg : Izotope RX7) : (select track) Shift + W
- Bounce Region in Place : Ctrl + B
- Bounce Track in Place : Ctrl + CMD + B
- Name Regions by Track Name : Control + Alt + X
- Slip Right by Nudge Value :Control + Alt + ]
- Slip Left by Nudge Value :Control + Alt + [
- Open / Close Toolbar :Control + Alt + Command + T
- Switch Automations in track(s) :Command + Y (nb: Automation should be On and if track(s) is selected)
- Add Markers for all regions:Select the regions, Alt + Shift + ' (or go to Navigate in the Global menu bar -> Others -> Create Markes for Selected Regions)
- Links Logic Pro X (10.4) - default Shortcuts
- F1 : Show / Hide Automation
- F2 : Delete All Automation on Selected Track
- F3 : Capture Recording
- F4 : Region Inspector Float
- F5 : Remove Silence from Audio Regions
- F6 : Split Regions/Events at locators or Marquee Selection
- F7 : Open / Close Track Stack
- F8 : None
Favorite shortcuts for Universal Control Surface
Ps : Be aware some shortcuts may be different depending on Logic 10.x.x Version and above
- Pressing "P" toggles the Piano Roll editor.
- Pressing "N" toggles the Score editor.
- Pressing "O" toggles the Loop Browser.
- Pressing "F" toggles the Browser.
- Pressing "Y" toggles the Library.
- Pressing "I" toggles the Inspector.
- Pressing "X" toggles the Mixer. (CMD+2: To open the mixer in a independant window)
- Pressing "B" toggles the Smart Controls.
- Pressing "J" to join selected midi region on the same track
- Pressing "K" Metronome On/Off
- Pressing "V" : View Plugins On/Off
- Pressing "B" : View Macro Plugins from the track
- Pressing "="" : To chop around cycle locator(Split Regions/Events at Locators or Marquee Selection used to be Ctrl + CMD + T)
- Pressing "U or CMD + U" : to set cycle locator around selected regions
- Pressing "Ctrl + E" : Convert Audio Regions to New Sampler Track
- Pressing "Shift + CMD + D" : To choose between Summing (Bus type) or Folder (VCA) Stacks
- Pressing "Shift + CMD + G" : SUMMING STACKS -> To make folder of tracks (kind of Bus/Aux)
- Pressing "Ctrl + CMD + Left or Right Arrow : Open / Close Summing Stacks"
- Pressing "Ctrl + CMD + F " : Pack Take Folder (then you can edit this track with all those Audio files as a comp)
- Pressing "Right Click -> Pack Folder ": Put selected tracks (regions) in a Folder
- Pressing "Alt + [ ": Put all selected region the right side next to each others
- Pressing "Alt + ] ": Put all selected region the left side next to each others
- Pressing " ' " : Marker On/OFF
- Pressing " ` " : View in Arrange Window Menu -> Scroll in play / Follow Cursor On/Off
- Pressing "CMD + F" : FLEX On/Off
- Track (in Logic Pro' Top menu) -> Replace or Double Drum Track Ctrl + D).

You can set different ways how to record Audio in Logic X :
- Logic Pro X
- Preferences
- Recording ...
- Overlapping Track Recordings
- Cycle off
- Create Take Folder
- Create New Track
- Create Track Alternative
- Cycle on
- Create Take Folder
- Create Tracks and Mute
- Create Track Alternatives
You can set different ways how to record midi in Logic X :
- LogicProX
- Preferences
- Recording ...
- Overlapping Track Recordings
- Cycle off
- Create Take Folder
- Merge
- Overlap
- Overlap / Merge Selected Regions
- Create Track
- Create Track Alternative
- Cycle on
- Create Take Folder
- Merge
- Merge Current Recording Only
- Create Tracks
- Create Tracks and Mute
- Create Track Alternative

Multi Midi Recording setting using more than One Midi Device/Track:
- File
- Project Setting
- Recording
- Midi
- Auto demix by channel if multitrack recording(should be checked)
- Midi data reduction (should be checked)

To play midi note(s) from the middle, which means you do not need to put the cursor at the beginning of the note(s) or Chord(s):
- File
- Project Setting
- Midi
- Chase
- Notes (should checked)
- Sustained (should be checked)
Below are the settings you should change in Logic Pro
- Preferences
- Advance Tool
- Surround ( should be checked)
- Preferences
- Audio
- I/O Assignment
- Output
- Quadraphonic
- File
- Project Setting
- Audio
- Surround format: Quadraphonic
- Preferences
- Display
- Mixer
- Channel Order: DTS (nb: Default is Film)
- Now You can use / select surround in the output track(s)
Make Notes the same lenght
- Select group of Midi notes
- Alt + Shift -> drag Left/Right
Select Midi notes with the same Velocity
- Select note
- Shift + C
Make notes same velocity
- Select Midi notes
- Change to Velocity Tool (t)
- Alt + Shift -> drag Up/Down
Join same notes together
- Select Midi notes (same key)
- CMD + J
Move Midi notes Up/Down
- Select Midi notes
- Alt + Up/Down Arrows
- Alt + Shift + Up/Down Arrows (by Octaves)
Notes Humanizes (Swing to avoid robot playing)
- Select Midi notes
- Go to Functions from piano rool window
- Midi Transform
- Humanize
Automation Piano Roll
- Press A
Automation Lanes (To toggle all Automation Recorded)
- Press A
- CMD + Y (to toggle the lanes)
Step input keyboard
- Toggle Midi input should be ON ( red midi plug at the Top Piano roll window)
- Step input keyboard : Alt + CMD + K
Multi Split notes
- Select Midi notes
- get Scissor Tool (t)
- Alt + left click
Display Notes Names and their Velocities
- View (from Piano Roll Window)
- Notes Label
Force Legato (trim notes to next note)
- Select Midi notes
- Right Click -> Trim Note End to following notes (force ce Legato)
- Shift + \
Remove Overlap
- Selec Midi notes
- Right click -> Trim note to Remove Overlaps
- \
Toggle Note Audition (Sound when you click a note in Piano roll, green Midi plug at the top of Piano roll window)
- Alt + O (to toggle On/Off green Midi plug at the top of Piano roll window)
Select Midi notes of the same pitch
- Select midi note
- Shift + E
Or below
- click on the Piano keyboard on the left side of Piano roll window
Select Midi notes of the same key ( eg : A1, A4, A5 etc)
- Select Midi note
- Shift + S
Select same Sub Position notes (to select all notes which start at the same time on the grid)
- Select Midi note
- Shift + P
Select Midi notes with the same Articulation (eg Articulation for Saxophone inst)
- Select Midi note
- Shift + D
Select All notes between Locator
- Select Track(s) in Arrange window
- Press E or P
- Shift + L
Select All Muted Midi notes
- Shift + M
Time Handle
- Enable Time Handle in Piano roll window : Function -> Time Handle or Ctrl + H
- Select Notes in Piano roll window
- Stretcht the Notes as wanted
- Desable Time in Handle in Piano roll window : Function -> Time Handle or Ctrl + H
Select All Muted Midi notes
- Shift + M

Instead of Gain Stagging:
Functions(Arrange Window ) : Normalize Region Gain
Affect : Individual Regions
Algorithm : Peak
Target Level : -18dB

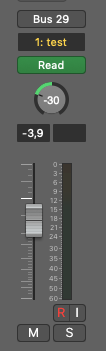
Above looks a bit weird but I will try to explain below:
- Gr1 Di Track is a Mono Track
- I/O is set to the correct Output(where the Re-Amp DI is) and Stereo Inputs(where Pre-Amp or Mics are) in the Sound Card.
- As you can see there is no output for the Gr1 Di Track. ( Ref to Logic Pro X manual [Recording Latency Compensation for I/O])
- Instead I add a Pre-Bus to an Aux, (above I send a Pre-Bus to Aux 43).
- Output of Aux 43 is set to Aux/Bus 38
- Then I can record the signal from input Aux/Bus 38 in any Audio Track with latency compensation.
Generally:
- Put a I/O Plugin (Utility->I/O) in your plugins.
- Set output and input for the I/O
- Check the Latency Compensation with Ping in I/O
- To record the Fx/Re-Amp with latency compensation, you need to reroute/send the output of the track to a bus(eg Bus 66),
- Then create a new Audio track then select (eg:Bus 66) for input
Ps: If you are recording the signal directly from the Hardware input in the normal way (which means not using the bus routing as mentioned above). the signal recorded will have some phase issue from the original.
Channel strips contain a plugin config for a single channel strip.
Copy Channel Strip Setting : Alt + CMD + C
Paste Channel Strip Setting : Alt + CMD + V
Patches
Patches can include track stacks, multiple channel strips and include auxes, so you can combine a layer of multiple instruments and associated auxes in one patch, for example.
Nb: If you want the Busses to be stored in a Patch, you need to include them into a "track stacks" first and then you need to save the "track stacks" as Patch.
LPX : Bus to Aux (in Mixer Window)
Ps : To know which Aux is used for a Bus :
Shift + Click on the Bus --> this will send you to the Aux (blinking/flashing)

You can use only one Audio Groove track in a project to lead other tracks (eg: Lead Vocal leading Back Vocals).
- Select the Main Audio Track (eg: Lead Vocal) with the yellow star on the left of the Logic Pro Track (this is hidden)
- Check in (checkbox) all Audio tracks (eg: Back Vocals) that need to follow the Main Track.
When you select a new Group, Logic will open the Group dialog in the Inspector. Give your Group a convenient name such as Drums
From here it’s important to enable two Group Settings in particular:
- Editing (Selection)
- Quantize-Locked (Audio)
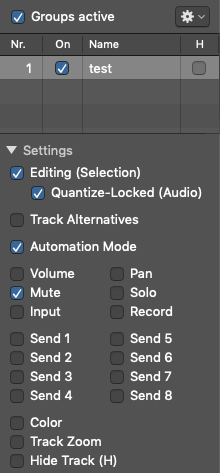
Editing (Selection)
When enabled, Editing (Selection) ensures any selection you make is applied to the whole group. So if you decide to chop a section out from the overheads, that same cut will occur for all other the drum tracks.
Quantize-Locked (Audio)
In this case, Quantize-Locked (Audio) ensures your Flex edits are exactly the same across the kit.
By enabling both of these settings, you can commit Flex edits with confidence.
Once you’ve nailed those, there’s just one more step for locked in Grouping:
Q-References
Q-References are essentially your guide tracks for Flex. You get to tell Logic which tracks are the most important ones in the Group.
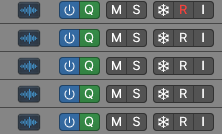
eg: for drums recording : Since most drummers play the kick and snare the most, I always choose the Kick and Snare as my guides.
Flex will analyze all your tracks. And Logic will cross-reference them with your guide tracks (with Q Ref green button selected). This means you won’t have way more Flex markers than you need.
Ps: If you need to edit transcients or anything in an individual track you will need to bypass the Group with : Shift – G.
If you need to manually remove third-party Audio Units plug-ins, you can find the files in the Library folders on your Mac.
You can install Audio Units plug-ins from manufacturers other than Apple to process audio in Logic Pro X, GarageBand, and Final Cut Pro. When installed, Audio Units plug-ins appear as individual components in the Library folders on your Mac:
- In the Finder choose Go > Go to Folder, enter "/Library/Audio/Plug-Ins/Components" into the Go to Folder field, then click Go.
- You can also check the Library in your Home folder. In the Finder choose Go > Go to Folder, enter "~/Library/Audio/Plug-Ins/Components" into the Go to Folder field, then click Go.

- Arrange Window View menu (Not in the Main Window View menu)
- Secondary Ruler
if your secondary ruler does not display time(min,sec), you need to check< if Use Musical Grid is check
- Record from the Main Window Menu
- Use Musical Grid
- Vintage EQ Collection
- Compressor
- Tape Delay
- Feedback: 0%
- Tempo Sync: Off
- Delay time: 0.0 ms
- Dry: Off
- Wet: 100%
- Phat FX
- When you place Tape Delay on your Stereo Output, set the following:
Insert fades best keyboard shortcut ableton
Fades are a valuable tool. not just for seamlessly joining clips and transparently bringing tracks in and out of a song, they're also a necessary utility for removing zero-crossing pops from your clips.
Follow transport best keyboard shortcuts ableton
Following playback let's you keep a careful eye on all the details of your track as it plays. very useful indeed, this shortcut both turns on and turns off the function.
Duplicate time keyboard shortcut ableton
This shortcut is great for creating variations and "children" from your current loops. just duplicate a few bars over and make adjustment to the patterns and sounds and you've got a b-section!
Paste time keyboard shortcut ableton
you don't always want everything moved over, I know. so just copy what you need and paste it right into the middle of your song!
Loop selection keyboard shortcut ableton
A great tool for looping whatever you have highlighted. in my opinion this makes session view obsolete for all but live applications. this same shortcut is very useful inside clips where it will snap the clip loop to the selection.
To select all the clips in the arrange window in a selected area : cmd + shift + l
Quantize settings midi audio keyboard shortcut ableton
You can quantize with cmd (ctrl) + u but if you want control over the settings you'll want to add shift. works for both midi and warped audio.
Consolidate keyboard shortcut ableton
I have to mention consolidate, just because it will change your life. incredibly useful to quickly "bounce" several clips into one. flattens any warp adjustments you make. works for both midi and audio. HUGE.
Group tracks devices keyboard shortcut ableton cmd (ctrl) + g does a lot of things and undoubtedly you're already using it for this and grouping tracks. one of the best features of ableton imo.
or
In the track head, select the paramater then right click -> delete Automation
or
Holdindg shift while draging a node parameter will overwrite the old parameters values.
GRID ON/OFF (snap to grid): cmd + 4
GRID to set a Smaller / Narrow : cmd + 1
GRID to set a Bigger / Widden : cmd + 2
Fixed Grid On/Off : cmd + 5