FX
- Dynamic Processing : Dynamic_range_compression | Pumping Use Sidechain from Kick Drum modulating SubBass (sine wave low freq)
- Dynamic Processing : 4 Varieties of dynamic range modification
- Dynamic Processing : Limiter | Limiting
- Dynamic Processing : De-essing
- Dynamic Processing : Noise_gate
- Dynamic Processing : Gain_compression
- Dynamic Processing : // Comp | New York Comp
- Dynamic Processing : Ducking (Side Chain)
- Sound Fx : Reverb
- Sound Fx : Delay
- Sound Fx : Echo
- Sound Fx : Reverse Echo (very nice on Cymbals or horror fx movies)
- Sound Fx : Flanger
- Sound Fx : Phaser
- Sound Fx : Chorus fx
- Sound Fx : Eq
- Sound Fx : Audio Filter
- Sound Fx : Distortion
- Sound Fx : Strech
- Sound Fx : Resonators
- Sound Fx : Robot fx
- Sound Fx : Synth
- Sound Fx : Modulation
- Sound Fx : Audio level Comp
- Sound Fx : 3D Audio fx
In General use compression with :
- A slow Attack (except from drums or something with big Transcient use Fast Attack time) and slow-middle Release time.
- Use the Knee to adjust the Volume amount.
- Use Peak instead of RMS (for tracks).
- Better to use 2 compressors with soft settings than one compressor with hard settings
- Avoid to use a compressor on a heavy Distorted Guitar. Let it breath !
Compressor Types
- Optical [LA2A or LA3A] : Great on Bass, Vocals, Guitar , (not great without quick transients).
- FET (Field effect Transistor) [1176] : UltraFast Attck + Release, Very Colored or not Transparent.
- VCA (Voltage Control Amplifier) [SSLg+] : Good compressor to use on MixBuss and Mastering.
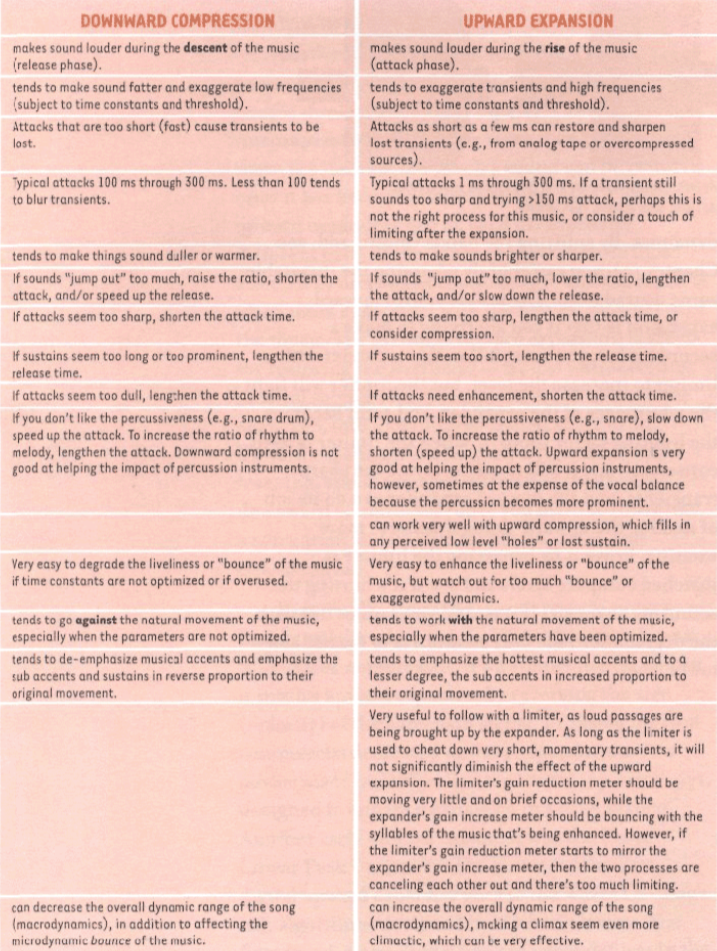
- Compressor Downward vs Upward
Compressor Ratio
- 2:1 Mild Drum
- 3:1 Moderate Bass or Voice (check to get a gain reduction between -3dB to -6dB)
- 4:1 Moderate (ps: this is the default ratio on general mixtable'compressor)
- 6:1 Medium
- 10:1 Strong Drums Rooms
Compressor on MixBus
- Do not make more than 2 till 3dB Max of gain reduction
- Slow Attack (around 10ms)
- Fast release ()
- Ratio 2:1 (general) or 4:1
- Set the Output Gain as the same as the Gain reduction (2dB Max)
Parallel Compression (NY compression) with Automation
- Do not Add compressor on a track with eg Volume Automation, the difference of Volume will confuse the Threshold of the compressor
- Remove track Automation
- Add the Parallel compression
- Sum both track + Parallel compression
- Now Add the Volume Automation
How to make a Lookahead Compressor ?
- Duplicate track, then move the copy track few samples earlier
- Side Chain one track from the other.
Glue Mix Bus
Below the Signal Flow for a Glue MixBus
- Pre-Master (All instruments + Voices) --> Master
- Voices only (0db) --> Glue MixBus
- All instruments only (-10dB) --> Glue MixBus
- Add a compressor to the Glue Mix Bus then send the signal (-20 or -25 dB) --> Master
Multiband Compressor and Dynamic Eq are basically the same.
Mutiband Compressor : Compare to a normal Compressor which effects the complete spectrum, with a Multiband Compressor you can add different Compressors (with different settings) on different range of frequencies (bands).
Dynamic Eq : you can use a Compressor on different selected area(s) or point(s), the small difference between Multiband Compressor and Dynamic Eq are the filters shapes, in Dynamic Eq the filter shapes more varieted.
WILL COME SOON
You can use a Transcient Shapper as an alternative to compression.
- Works on almost everything
- Can be used on Drum bus, Kick track, snare track. etc
- Can be used to Vocals
- Can be used to Bass
- Can be used to remove finger-slide noises of bass player or guitar player
- Nb: Izotope Neutron can do multiband in its Transcient Designer
Saturation is a good tool to fill in the impression of loudness without leveling up the Volume
- Ps: More you add Saturation more your peaking level goes down.
- Odd Harmonics give boost more important than the even harmonics
- Even Harmonics give a boost more round to the sound
- Types:
- Analog
- Tape (very fast compared to other Saturation)
- Tube
- Warm
- Triode
- An Exciter can be understood as a Saturation Tool on a multiband, you can set different saturation values for different frequencies bands.
Distortion describes a more extreme effect than saturation. While saturation adds a warm characteristic to a sound without markedly changing its character, distortion breaks it up more radically. It can vary a lot in nature, from a smooth fuzz to harder-edged sound with a lot of high-end bite and a sort of buzzy sound.
It can be used for:
- Guitars
- Parallele Compression for drums
- Use distortion to modify an aux effect. Try inserting a distortion plugin to modify an aux effect. For example, insert it after a delay to create distorted echoes, or after a reverb to add subtle fatness to the vocals.
This specifically refers to reducing the sample rate or resolution (which causes a 'digital' distortion sound).
Bit Crusher is good if you want to boost Guitar, Drum, or synth without using a compressor.
Will come soon
EQ General:
- High Pass Filter HPF = Low Cut
- Low Pass Filter LPF = High Cut
- Band Pass Filter BPF
- Band Rejection : Hard Cut
General Eq trick for checking Eq : Gain Volume after and before the Eq should be the same, not louder!
- HPF on all tracks around 80Hz-100Hz for all tracks except Bass and Kick Drum.
- Cut of 3dB on 400Hz for all muddy tracks.
- Match Eq with ref track : ref Track should be same style, the song should be in the same key.
| -- 8 - 10 kHz Hihats/Cymbals/Shimmer
| -- 6 - 7 kHz Sibilance (De-Esser)
| -- 5 kHz Presence
| -- 2-4 kHz Vocals
|
|
| -- 1000 Hz Snare (boost)
|
|
| -- 300 Hz Mud (cut around all tracks)
|
| -- 100 Hz Kick (Boost)
| -- 60- 80 Hz Bass (Boost)
| -- 40 Hz Subness (HPF)
| -- 20 Hz (HPF)
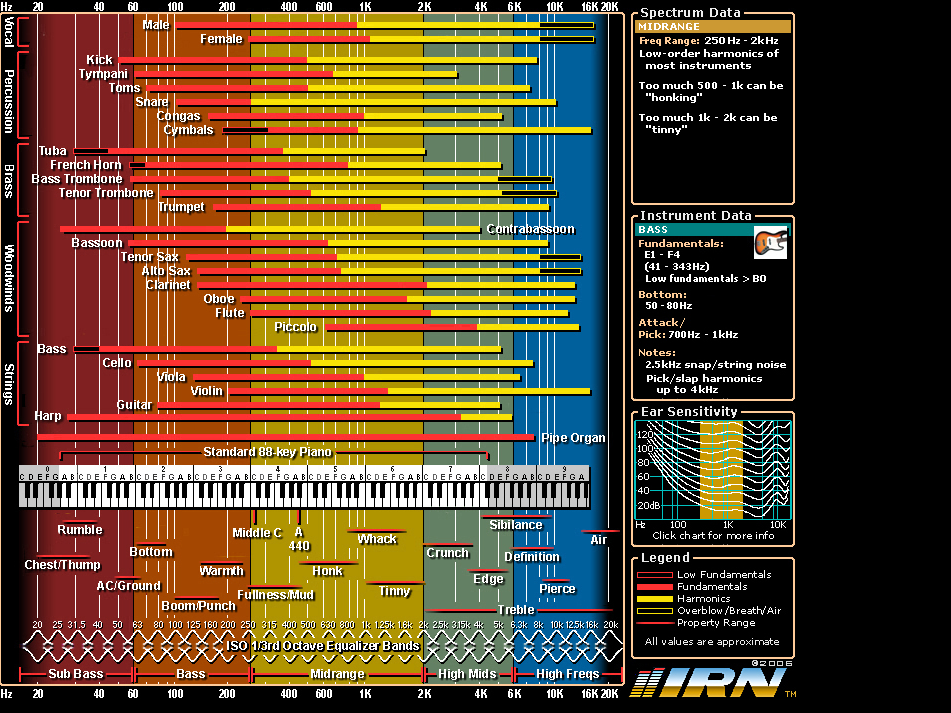
20 Hz --- LOW --- 150 Hz ---- LOW MID ---- 500 Hz ---- MID ---- 2 kHz --- Hi MID --- 6 kHz --- Hi Freq --- 20 kHz
20 Hz --- DOWN --- SUSTAIN ---- BACK ---- 500 Hz ---- MIDDLE --- Transcients --- FRONT --- Transcients --- AIR/UP --- 20 kHz
Maag Eq4 Freq
- 30 Hz
- -5 / +5
- 40 Hz
- -5 / +5
- 160 Hz
- -5 / +5
- 650 Hz
- -5 / +5
- 2.5 kHz
- -5 / +5
- 5 kHz
- (Air Gain - Only High Shelf band selectable) 0 -> 10
- 10 kHz
- (Air Gain - Only High Shelf band selectable) 0 -> 10
- 20 kHz
- (Air Gain - Only High Shelf band selectable) 0 -> 10
- 30 kHz
- (Air Gain - Only High Shelf band selectable) 0 -> 10
- 40 kHz
- (Air Gain - Only High Shelf band selectable) 0 -> 10
Maag Eq2 Freq (only boosting)
- 30 Hz : Only Low Shelf selectable from this range : 0->10
- 40 Hz : Only Low Shelf selectable from this range : 0->10
- 57 Hz : Only Low Shelf selectable from this range : 0->10
- 65 Hz : Only Low Shelf selectable from this range : 0->10
- 88 Hz : Only Low Shelf selectable from this range : 0->10
- 150 Hz : Only Low Shelf selectable from this range : 0->10
- 220 Hz : Only Low Shelf selectable from this range : 0->10
- 250 Hz : Only Low Shelf selectable from this range : 0->10
- 400 Hz : Only Low Shelf selectable from this range : 0->10
- 1 kHz : Only Low Shelf selectable from this range : 0->10
- 1.4 kHz : Only Low Shelf selectable from this range : 0->10
- 2.5 kHz : Air Gain (only High Shelf selectable) : 0-10
- 5 kHz : Air Gain (only High Shelf selectable) : 0-10
- 10 kHz : Air Gain (only High Shelf selectable) : 0-10
- 15 kHz : Air Gain (only High Shelf selectable) : 0-10
- 20 kHz : Air Gain (only High Shelf selectable) : 0-10
- 40 kHz : Air Gain (only High Shelf selectable) : 0-10
- Cut or boost 1.5dB
- Cut around 20Hz
- Cut between 220 and 500Hz(for the muddy guitar)
- Boost around 2.5kHz
- Boost around 6kHz
Ps: The way of working is :
- Put the tracks
- Level the faders and panning for general mix
- EQ on MixBus
- EQ on the rest of the tracks
Kick Drum : Low 50Hz -> 100Hz , Cut Mids 360Hz -> 800Hz for rock, Attack 2kHz or 4kHz depending on the style.
Eq General Triq for Kick : HPF from 30Hz (except for 808 kick), then boost the low end around or below 100Hz, then Cut the Resonance Peak above it (eg: around 160Hz), this will give more definition to the kick.
Snare Drum : Important freq are : 100Hz -> 220Hz, 1kHz -> 1.4 kHz
Toms : Filter 40Hz + below, Mids 500Hz Cut for Clarity
Hat+Ride : Filter from 200Hz + Below
OvverHeads (Boost around and remove 2.5dB to 3dB when it sounds boxy):
Filter 40Hz (try 100Hz) + below, Cut Mids depending on the style , eg : cut 2.5dB around 600-700Hz, cut 2.5dB around 300-400Hz.
nb: Do not compress Guitar distorted or satured (they are already compressed)
Acoustic Guitar : HPF 50Hz, Mids 2kHz -> 2.6kHz (try to boost in 10kHz)
If you have more than one guitar : Make Eq Holes between them (to avoid freq fighting):
Guitar 1 : Cut at 1kHz and Boost at 2.5kHz
Guitar 2 : Boost at 2.5Hz and Cut at 1kHz
Pultec Metal Guitar 666 Trick
- LOW BOOST : 6 - LOW FREQ: 30Hz
- LOW ATTEN: 6
- HIGH BOOST: 6 - HIGH FREQ: 16Hz
- HIGH BANDWIDTH: 0
- HIGH ATTEN: 0
- HIGH ATTEN SEL : 10
- Spring Reverb : Guitars, Vintage Vocal (mono => Making in your face)
- Plate Reverb : Vocals (use pre-delay)
- Hall Reverb (most versatile) : Classic Analogue Stuff, Vocal with a lot of space, Strings
- Chamber Reverb : Drums, things which are not from Microphone (eg : Synth or Drum Computer)
- Room Reverb [to make small atmospheric spaces] (use reverb gated) : Guitar ( to make it sounds recorded from a small club)
What to check and how to fix:
- Check the decay time
- Check Reverb Pre delay (to push more to the front)
- Learn how to use Reverb for 3D Space(H=Reverb, L&R = PAN)
- If your mix is too dark (no air), try to add a Reverb (decay less than 2sec) and boost High Freq.
- If your mix has to much mud, try to add a reverb (decay less than 2sec) and cut freq between 250 till 1 kHz.
- If you want to add body to your mix, try to add a reverb (decay less than 2sec) and boost low freq.
- Add a Bus to your Kick Track
- Add Reverb 100% Wet followed by an Eq with HPF on your Aux track.
Send Reverb when voice is stopping:
- Add a Send Bus to an Aux track from your Voice track
- Add Reverb followed by a Compressor with the Voice track as Side-Chained Trigger on your Aux track.
Reverb Trick Fx Horror Voice Movie:
- Add a Send Bus to an Aux track from your Voice track
- Print/Bounce Bus/Aux 100% wet with HPF.
- Invert the above Print/Bounce
- Cut the result where you want, now put the result where you want in your session.
If you have 2 Stereo Tracks (eg : 2 different guitar recordings) :
- Track 1 should be panned LEFT then send the signal to bus1 with reverb adjusted, the result should be panned RIGHT
- Track 2 should be panned RIGHT then send the signal to bus2 with reverb adjusted, the result should be panned LEFT
- In the Stereo Aux : Add a Mono Reverb
The Abbey Road reverb EQ technique not only prevents a track from swimming in reverb and thereby losing intelligibility, it also offers a means of gluing instruments and vocals together in a mix. It eliminates annoying high-frequency tails, increases clarity, yet still provides the sheen and size that reverb can impart to a sound. The trick is actually quite simple and works with any and every reverb unit; hardware or software. If you’re working with plug-ins, insert an EQ with high and low shelving filters ahead of the reverb unit. Position is important. EQ placed ahead of the reverb results in a smoother sound, since you’re equalizing the frequencies that are activating the reverb’s reflection algorithms. Since reverbs often accentuate certain frequencies, placing EQ after the reverb doesn’t have the same effect as taming the frequencies before they come in to the unit.
The essential part of this technique is to set the equalizer’s high-pass filter to a 12 or 18dB/octave slope and cut everything below 600Hz (that’s right, 600Hz). Set the low-pass filter with the same slope and cut everything above 10kHz. There you have it, the reverb EQ that Abbey Road has been using since the ’60s. However, you don’t have to stick with the high-frequency setting (the low frequency is not negotiable). You may find that cutting the highs down to 8kHz or 7kHz (or lower) works better on certain vocals or instruments in context. The idea is to reduce the highs until you can hear the vocal without the obvious high-frequency reverb tail. Another useful variation of the Abbey Road reverb EQ, in the case of vocals, is to notch out a tiny amount around 2kHz-4kHz, which will reduce possible harshness in the presence range. In the case of drums, you can cut highs further, even down to around 2.5kHz. It’s a very narrow frequency band, but it still offers all the benefits that reverb provides without adding high-frequency harshness (especially when there’s a lot of “metal-work” going on).
- Drums/Beats variation => Use a PingPong Delay, or stereo delay ( L=X(ms) R=X*2(ms) X=time delayed, use a long delay for PingPong Fx)
- Better width with Mixing : Use a Sample Delay to make MONO to STEREO but be aware of the Mono compability (Correlation).
Nb: From 500 till 600 Samples gives Big width effect without echos. - Better width with Mixing Haas Effect: Use a Normal Delay .30 -> 40ms the Fx will be blend with the original sound, Nb:More than 40ms gives echos.
Pitch Shifter can be used on Claps:
- Add a Pitch Shifter (low)
- Then Add a non linear Reverb.
Pitch Shifter as a Harmonizer
- Voices: Recording twice the voice or guitar (with another Sound Setting) make the result stronger, and create a normal Harmonizer.
- Better width with Voice Mixing (fake of Double tracks / Fake Harmonizer):
From the MONO source,send 100% to BUS Left (with Pitch Shifter Correction(x),and 100% (from MONO track) to BUS Right (with Picth Shifter Correction[-x]);
Don't use SEMITONE - This avoid the Mono uncompatibility in the correlation (no Phase issue) because we don't use delays but Pitch Shifter.
De-Esser can be seen as a compressor on one selected band only (high freq for sibilance) with a very fast attack time.
This tool is generally used to minimize the "S, T, P" letters.
When you set/create/use a Fx-Bus or/and when you create a track :
- Do not forget to send its output to its corresponded Sum Bus. (eg Dr Fxn - > Dr SUM).
This is practical and will avoid the problem to have the effect appart when we solo Dr SUM.
Different type of Busses :
- Pre Fader : The fader'track does not interact
- Post Fader : The fader'track does interact
- Post Pan : Pan does interact